Tuesday, September 29, 2009
Splinter Cell Conviction
I've been doing some research into upcoming games recently to check out any new approaches to animation pipelines and conceptual ideas. I began looking into the next installment of the Splinter Cell series: Conviction. In it, they talk about a new gameplay mechanic called 'marking.' The premise is that Sam Fisher can survey enemies and environmental elements while concealed in the shadows, and when he springs into action, the game begins to take over, and execute the targets in the order you specify. This allows the user to get the drop on enemies in a planned, orderly fashion, that helps you to feel powerful and in control, instead of like a lame duck as some of the older Splinter Cell games did.
Aside from this being a fun gameplay mechanic, I think its pretty interesting from an animation standpoint as well. Instead of the player controlling all the action, and the game having to interpolate and interpret these inputs on the fly, sometimes resulting in hideous animation, it can specify a single animation or a series of cycles that are planned to run together, resulting in a highly polished, smooth, visceral result. I'm looking forward to being able to try it out. If it works as smoothly as some of the videos show, it could really be a nice improvement to the franchise and gaming as a whole.
Thursday, September 17, 2009
Pencil Tests
I found this site linked to from Josh Burton's blog today. There are some absolutely beautiful pieces of animation displayed here. It is definitely worth a look if you have any interest in animation whatsoever.
On a side note, I always find pencil tests so beautiful. They seem to have so much more emotion and action than the final cleaned up stuff.
Pencil Tests
Tuesday, September 15, 2009
Cloudy With a Chance of Meatballs
Wednesday, September 2, 2009
Replace the Animator?
I just read an interesting entry from Keith Lango's blog. It's dealing with the 'controversy' that arose surrounding the movie Avatar, which is being directed by James Cameron. Someone on the production said,
"Our goal on this movie was not to replace the actor, it was to replace the animator. If you think about it, what a great actor does and what a great animator does are antithetical to one another. "A great actor withholds information. Dustin Hoffman in All the President's Men can sit there and do nothing. No animator would ever allow that, they would put in a twitch. So our objective was to preserve Sam Worthington's performance and have that be what you see in those characters."
Keith Lango had an interesting take on it saying, "I eagerly await the day when mo-cap technology gets so good that animators won't be stuck wiping the poo from the data or twiddling the performance because the director can't keep his hands off it and trust his actors." Which is completely contrary to the initial response many animators are having. (Reminds me a lot of some comments made before Polar Express came out.) He goes on to further emphasize the difference between the intent and purposes of live action (mo-cap) and animation. Its an interesting view, and some points he makes I've never really considered myself. Though, I think I must agree with him. Actors and animators each have their role. I highly encourage the read.
This still plays out a little differently in the gaming industry I think. Here, we're focused more on motion and believability than performance, unless we're animating through a cut scene. I think animators will always be needed to push actions further and tweak things to make the inhumanly possible, which is why games are fun anyway. Take Drake's Fortune as an example. They used mocap, but adjusted the timing and poses to push things further and create the experience they were looking for. Besides that, some things simply can not be captured by a person in a suit. That is where animation, and animators, will always be a necessity.
Tuesday, September 1, 2009
Oktapodi
If you haven't heard or seen Oktapodi, its definitely time you were introduced. I found this movie a while back, and it blew me away. Its a student film from Gobelins. I recently went back to the site to see if they'd updated anything, and found out that it had been nominated for the Best Animated Short this past year. It has apparently won a slew of other awards as well. You should definitely check out the site. They have some nice 'making of' featurettes as well.
Oktapodi
Gobelins
Monday, August 31, 2009
Disney Buys Marvel
Friday, August 28, 2009
Tired Old Dragon
I came across this picture recently on Mark Behm's site. I really like all his stuff, but for some reason I was really taken by this image. My mind immediately jumped to try and fill in this little guy's story. The mood is amazing, and I think it illustrates just how much you can say about a character with a single pose.
Wednesday, August 26, 2009
Vilppu
If you've never heard of Glenn Vilppu, and you're into animation, then its about time you get introduced. Glenn is an amazing figure drawing instructor that emphasizes body language, attitude and gesture over realism. This makes him an ideal teacher for animators who are all about the action. I had the pleasure of taking one of his courses while I attended SCAD. My drawing skills increased triple-fold in that short time. He has a book out that explains his theories, called the Vilppu Drawing Manual. I recently came across an archive of some of his lessons on AWN. They're definitely worth a read if you can find the time.
Vilppu Drawing Lessons.
Laika
I just came across this article, thought it seems to be about a month old now. Its an interview by Animation World Network (AWN on my links to the right) with Travis Knight, who is now the studio head at Laika.
I had the opportunity to meet some of the other awesome artists, including Henry Selick, when I was part of their Project Backpocket summer internship a few years back. So, I always have an affinity for the company. From what I remember, which may be inaccurate, someone told me he began working there sweeping the floors after his Father, Phil Knight, purchased the company from Will Vinton (formerly Will Vinton Studios). He then started talking to animators working there, and took a stab at doing some stop motion for them. And from there he progressed, and is now the CEO of the studio. Its a pretty neat story. Anyway, here's a link to the interview.
AWN Interviews Phil Knight
Tuesday, August 25, 2009
Kiskaloo
If you haven't heard of it, Kiskaloo is a little comic created by Chris Sanders, the creator of Lilo and Stitch. Its an awesome little strip. The humor is spot on, and the characters are adorable. Sadly, it hasn't been updated in quite some time. He's been busy working on a couple movie titles with Dreamworks if I'm not mistaken. If you get a chance you should definitely check it out.
Thursday, August 20, 2009
Treadiness
Alright, so, I have to come up with a rigging pipeline for tank treads. This will be a bit tricky and interesting, but good. I've been doing some research on different forums, which all give basically the same solution: Attaching Geo to a motion path, and using time or some attribute to drive the uValue of the motionPath node. This seems fine and good, and can yield the necessary results, but there's an issue. You can't make the treads slow down to a complete stop.
Since the controls effect the uValue, by slowing speed on many of the controls, the uValue declines as well, so the treads reverse course along the length of the path. So, I'm trying to create a system of some kind that will allow the user to drive the uValue in some intelligent way. So that when keyframed, you can bring the treads to a complete stop, smoothly. I'll update with progress as I flesh this one out. I'm thinking of using some kind of SDK, but we'll see. I've already tried messing with blend shapes, but he linearity of them kills that hope. Setup would be heavy and complex anyway. So, here we go...
===============================================================
===============================================================
Alright, I've managed to figure out the control aspect for this. Its pretty simple in hindsight. After I spoke with a programmer here at work, and explained the functionality I needed, he asked about using a module.
In the case of MEL Scripting, it was the 'fmod' command. This will take two values, divide them, and give you the remainder in a float (decimal point) value. So, we can take the input of the control, use its value as the first input for the fmod function, and our upper limit as the second term. This will always keep the value below the upper limit. In this case the upper uValue, which was 0.394 (since my working units was in cm. If you work in inches, the uValue would be 1). Then, I had to do a bit of magic to tweak the control istelf, and make it work in reverse for negative numbers.
So, the final functionality is that if you raise the value on the control to positive integers, the object moves around the curve in a clockwise manner. If you decrease the value, or go into negative values, it runs counter-clockwise. Just the functionality I needed.
Once I pump out the remainder of the script, namely duplicating geo, attaching it to the path, and offsetting the uValues, I'll post what I can to explain the process as well as the script. So stay tuned...
===============================================================
===============================================================
Things have really picked up at work here lately. So, I've been poking around at this when I've had free time. Its nearly done. I have the script running pretty smoothly with lots of options for the users. All I really have yet to add, is the creation of the control expression... the one that will actually drive the objects around the curve. Everything else is basically made, and just needing to be assembled.
As I kept playing with this, found I kept needing to add features. So now, you can specify which local direction of the tread object faces down the curve, whether the geometry is instanced or copied, if you want the geometry controlled by joints (for export into game engines), and you can specify how many treads you want along the curve, or have it detect the proper amount automatically based on the length of the object and the length of the curve. Its pretty neat.
I've also kept a lot of descriptive comments in the script itself so future users can easily pick through and decipher what's going on. There are also 'About' and 'Instructions' menus in the UI. The 'About' menu will describe how the script works in a general way, with notes on how to potentially change it if desired. The 'Instructions' menu tells you... well, how to run the script. I'm hoping to have this done in a couple weeks, work permitting. I'll keep you up to date with what's going on.
===============================================================
===============================================================
So, after my last post, things at work did pick up and have been running pretty fast ever since. I have been able to 'finish' the script. Meaning, it can run fine in a scene... twice, then it breaks, and some of the code it actually generates for the expressions to control the treads is funky. It's leaving out = signs, and variable declarations, but they still work in the scene. I'm still not sure why this is happening. So, aside from some trouble shooting on those accounts, it seems to be working fine.
Now that all the logic and math is figured out, I may rewrite it more concisely and try to eliminate those errors that are happening. But again, in due time, with ample time.
If there are any questions, ask away and I can try to help.
MEL Basics
I came across this site from one of the forums I peruse daily. It has a lot of good basic MEL documentation, including different types of flow control, how to access attributes, etc. Check it out if you're just getting into MEL Scripting:
http://www.robthebloke.org/
Awesome Spine +
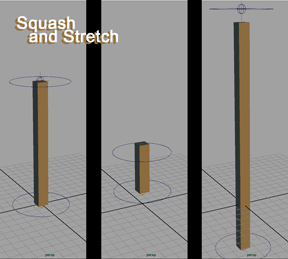
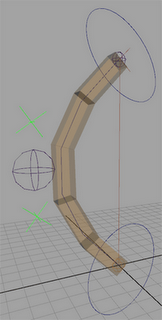
I just came across a nice new spine setup on CGTalk, by 'mberglund'. You can find the main part of the tutorial here: Awesome Spine Tutorial I took his basic setup and added a bit more to it. I put some squash and stretch in there, and a cool mid-spine controller to really let you push the arch of the back's curve. So, go through his tut, then pic up mine from where he left off.
*edit: He just posted a video link for how to setup the the awesome spine. Find it here.
I managed to implement the squash and stretch feature to it too...pretty simple overall. I'll try to outline it below. I used translation manipulation to adjust the scale of the joints, and not the actual scale attribute, but the technique should be applicable either way. This just makes for fewer connections to make to see the final result. I'll add some pics in later...
================================================================
Squash and Stretch:
First thing to do, is to select the splineIK curve. In the command line or script editor, type "arclen -ch 1;"
This will create a curveInfo node that will store the length of the curve. With the infoNode still selected go into the hypergraph > input/output connections view.
Create a multiplyDivide node by going under the Rendering Menu > Create Render Node. In this menu, go under the Utilities tab and click on multiplyDivide. If this doesn't show up in the hypergraph window (as it doesn't in mine) Shift-select the curveInfo Node, and go under the Graph menu of the hypergraph, and click Rebuild. This will now display the curveInfo and multiplyDivide node.
Whether in the connection editor or the hypergraph, connect cuveInfo1.arclen to multiplyDivide1.input1X
Open the attribute editor for the multiplyDivide1 node, and type the value from input 1 into input 2. Set the function to divide.
The output will now be normalized. So we can connect this to a multiplyDivide node to control the X translation of the joints (simulating their scale in length).
So, to do this, create another multiplyDivide node, select the first multiplyDivide node, shift-select the second, and open the connection editor. Connect the outputX of multiplyDivide1 to the input1X of the multiplyDivide2 node. If you select the multiplyDivide2 node now, and open the attribute editor, you should see input1 has a value of 1.
Select any of the ik or bind joints, besides the root or first joints, and find their translateX value. Type that value into the multiplyDivide2's input2X window.
Now, just go through and connect the outputX of multiplyDivide2's node to the translateX attribute for the spine_2+_ik joint and the spine_2+_bind joints.
Adding the Mid-Spine Controller:
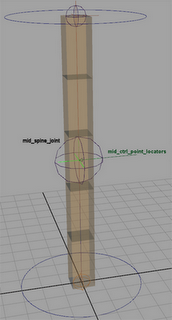
This next part is fairly simple. First, create a joint and position it halfway up the length of the spine, then group it to itself, by selecting it and hitting Ctrl+G. Then, move the group's pivot point to the same position as the joint, by hitting 'insert' or holding down the D key, and point snapping it to the joint (hold the V key).
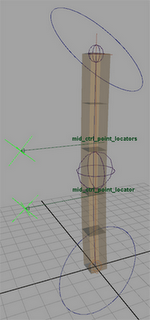
Then, create two locators, one named 'mid_hip_point_loc' and the other 'mid_shoulder_point_loc' Snap them to the joint's position as well.
Parent mid_hip_point_loc to the hip control, and mid_shoulder_point_loc to the shoulder control.
Now, you'll see that as you rotate the two controls, the locators move with the rotations in nice pretty arcs.
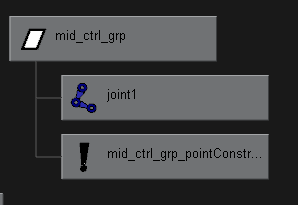
Now, we need to have those control the position of the mid-joint's group. So, select the two mid_point_locators, then the mid joint's group, and go to Constrain > Point Constrain on the marking menu. The Joint should now move and maintain a middle position in relation to the two mid_point_locators.
Now, we just need the joint to affect the curve. So, grab the mid-spine joint, shift-select the spine's curve, then on the marking menu (hold the Space Bar to bring it up), go to Skin > Edit Smooth Skin > Add Influence. This will add the joint as an influence to the curve.
And there you have it. More control over the curve of the spine, while still allowing for the twisting ability. Enjoy!
Foot Matching
One of my latest work creations came about after reading through a post-mortem on Ratchet and Clank. But, it will only be a valid solution, if the characters you're animating are going to remain in the same place...so, animating over the origin in Maya or Max or what have you.
It consists of a simple window, in which you can input the desired walk or run speed of a character, and the distance in which their legs are spread during the cycles. It then proceeds to create footprints of your character in a line, like on a treadmill, moving at the specified rate. It doesn't necessarily match the stride length of the character, since that will vary too much to put into a script. BUT, it will give us a reference for how quickly the feet should be moving to match the translation in game. This will eliminate a LOT of the guess and check work, and should move things along nicely. And, it was fun to get cracking into the code again.
Controlled Bendiness
I'm going to go ahead and throw this post out there as something to come back to as I experiment. I've been trying to find a unique solution for creating a bendy limb rig. I'm shooting for something similar to Christopher Crouzet's rig, which I mentioned here. I want something to create and maintain a smooth tangent curve over the length of the limb (let's say leg in this case), instead of multiple secondary controls for each span of the leg. Overall I'm envisioning this constant curve over the length of the leg, then an additional layer of control below that, where its applied to the upper and lower portions of the leg, and if its not overkill, an additional layer with two of these per span of the leg.
I'm playing now with creating a curve and utilizing tangent constraints on the joints. I want to try to find a smooth way to manipulate the curve. So, we'll see what happens.
Rigging Excitement
Wow...so inspiration and creativity abound! I've been looking around the web lately to find interesting solutions to rigging conundrums, and I came across a couple of amazing TD reels. I had seen one before, but just decided to write about it now. The two guys I'm talking about are Victor Vinyals and Christopher Crouzet. I'm pretty sure you can find their stuff on youtube as well, but I wanted to give their site some hits, as they deserve them.
I came a cross these during my recent exodus again into the realm of rigging. I've been trying to find sources, and contact old professors to find potential avenues to take so that I can learn more about rigging and scripting and all the magic that occurs, before the magic that's seen. So, check those guys out, and hopefully they'll inspire you too.
Animator Friendly Rigging
So, I love my job...and my employer. I came across these dvd's by Jason Schleifer, Head of Character Animation at Dreamworks, on 'Animator Friendly Rigging.' I love a lot of the stuff Jason's done in the past, and thought I'd talk to Human Head about getting a few. In total, all the videos would come to about $300, so there was no way I could get them on my own. But they didn't even bat an eye...got the purchase approved, and I've been watching them the last couple weeks... very cool stuff.
As far as rigging tutorials, dvds, and materials go, these are by far the most in depth and relevant ones I've seen in a long time. Each video is about 2 hrs long and cover the torso, neck and head, arms, hands and legs. So, multiple hours on each body part. If you can afford them, or even one, I highly recommend them. I'm just trying to spread the word.
GDC 2008
I had the awesome opportunity to go to GDC 2008 in San Francisco this year. My primary task for going was to look into the possibility of utilizing Motion Capture for Human Head (HH). I checked out a bunch of different systems to see which would best fit our needs. So that was a lot of fun, running around the expo playing with toys and the like. I've never really worked with Mocap before, so I'm really excited about getting into it.
Aside from that, I attended several sessions, but by far the ones that stood out to me were the 'Storytelling in Bioshock,' 'Uncharted Animation,' and 'Creating a Character in Drake's Fortune.' The 'Uncharted Anim' presentation dealt directly with incorporating motion capture into a pipeline, while still obtaining a stylized result. So that was awesome. Jeremy Lai-Yates did a great job of presenting his ideas, and clearly conveying the process they went through to arrive at their solutions. You should check out his blog and stuff...cool guy.
I'll keep updating this as we begin to Purchase and implement our Mocap pipeline to give you all a good feel for what we're going through.
MEL Notes
In this section, I'm going to keep some general notes on MEL and how it works. These are things I slowly discovered through trial and error, or shortcuts & explanations I picked up from forums. Hopefully these will be of some use.
∞ Operators =========================
==================================
$x++ // adds 1 to the value of $x, and makes $x that result.
$x-- // subtracts 1 from the value of $x, and makes $x that result.
$x += 5 // adds 5 to the value of $x, and makes $x that result.
$x -= 3 // subtracts 3 from the value of $x, and makes $x that result.
Example: If $x = 5, then $x -= 3, will make $x = 2.
∞ The # Key =========================
==================================
*note: the following came from a post on the MEL forums at HighEnd3D.com, and relate to an example of controlling window visibility. But, one function of "#" is described here:
============ Window Visibility ==================
{
window -title "Vis Test" -s 0 -w 200 -h 200 VisTestWin;
columnLayout;
rowLayout -nc 2;
checkBox -label "click me" -vis 1 -cc "floatFieldGrp -e -vis #1 -v 1 scaleVal" myCheckBox;
floatFieldGrp -vis 0 scaleVal;
setParent ..;
showWindow VisTestWin;
}
Note: #1 reverts the value back to its first value.
yeah, the # feature of control commands is a kind of "hidden" feature, i.e: it's definitely in the docs somewhere but good luck finding it.. smile.gif
the #1 represents the FIRST VALUE of the control, and likewise #2, #3 and #4 represent the 2nd, 3rd, 4th, etc..
it doesn't matter what type of control it is, as long as it has a value or values, so you can do stuff like this:
intFieldGrp -nf 3 -cc "optionVar -iv pref1 #1;optionVar -iv pref2 #2;optionVar -iv pref2 #3";
so that whenever you change any of the 3 int field values, it stores all three in respective optionVars...
not *all* controls support this feature (e.g. optionMenu) but most of the useful ones do (bool, int, float and slider controls)
it's a very useful shortcut as it allows you to do away with lots of pointless global procs and keeps your UI code more self-contained (which I personally prefer in most cases)
:nathaN
==========================================================
It can also be used as below (also from HighEnd3D):
"{
string $window = `window`;
columnLayout;
floatField -minValue -10 -maxValue 10 -value 0
-dragCommand "theFloatFieldChangeCommand #1"
-changeCommand "theFloatFieldChangeCommand #1";
showWindow $window;
}
global proc theFloatFieldChangeCommand(float $input)
{
print("$input: " + $input + "\n");
}
you could do
floatField -changeCommand "theFloatFieldChangeCommand (`floatField -q -v floatFieldName`)" floatFieldName;
as well but #1 is real good for floats ints and checks!
Works with string-fields as well until you enter a "
-ewerybody
So, here, it is used to pass the value from the floatField to the necessary input for the, "theFloatFieldChangeCommand" command. Its a pretty useful little tool.
============================================================
∞ Regular Expressions=================
==================================
∞ A good RegEx link: http://www.regular-expressions.info/
∞ Regular expressions are used to define search strings. These can be most helpful
with MEL's match, gmatch, strcmp and other string based commands.
∞The basic building blocks of a regular expression are as follows:
. Matches any single character
* Match zero or more occurances of the preceeding expression
+ Match one or more occurances of the preceeding expression
^ Matches (anchors) the expression to the start of a line
$ Matches (anchors) the expression to the end of a line
\ escape character. Use this in front of a special character (e.g. '*') ............ when you wish to match the actual character. Note that ............ MEL strings resolve control characters that use '\' when ............ they are first parsed. So, to use a '\' character in an ............ expression, you must escape it (e.g. "\\") so that it is ............ passed through to match.
[...] Matches any one of the enclosed characters. A pair of characters separated by - matches any character lexically between the pair, inclusive. If the first character following the opening "[ " is a "^" any character not enclosed is matched. A - can be included in the character set by putting it as the first or last character.
(...) Used to group part of an expression together.
∞ 'ls -sl'============================
==================================
This will error out:
string $ctrlName = `ls -sl`;
$ctrlName = anyOtherString;
Maya will make 'ls -sl' a string array, even though I declared it above as a 'string' because 'ls -sl' ALWAYS returns a string array, even if its the empty string "".
So, the above code is trying to make a string array a string which is a no-no.
∞ When Making Windows ==============
==================================
There is a setting in the Settings and preferences menu that tells Maya to remember the size and placement of all windows you open in the interface. Look under Windows > Settings and Preferences > Preferences and on the top tab, the 'Interface' tab there should be a checkBox labeled 'Windows: [ ] Remember Size and Position.' If this is checked, then once the window is created, Maya remembers what size it was, its contents (mostly) and where it was in the interface. So, any changes you may make in a MEL script, even if you source it again, will not show up if they affect the size of the window. To see your code actually updated, uncheck this box until you're done creating the window. Or, you can use a specific windowPref command in the MEL to tell Maya what to remember about the window.
-sd
MEL Errors
For your reference and mine, I'm going to use this post to list common MEL Errors that I get, and to what exactly they were referring. Hopefully this will give you some kind of reference on things to look for in your syntax.
Error | Cause:
∞ "Invalid call to gmatch" | String functions such as 'gmatch' and 'match' are picky about declaration types, so you should explicitly declare the the variables as 'string' variables. Here's a code snippet to illustrate:
This will error out:
proc deleteLoc()
{
$sceneList;
$sceneList = `ls -tr`;
if (`gmatch $sceneList[$i] "*_Tloc"`)
delete $sceneList[$i];
}
This will work, because $sceneList is defined as a 'string' variable:
proc deleteLoc()
{
string $sceneList;
$sceneList = `ls -tr`;
if (`gmatch $sceneList[$i] "*_Loc"`)
delete $sceneList[$i];
}
∞ "$object is an undeclared variable." | This error can be caused by several things. So far, my most common mistakes that generate this, have been forgetting a backtick (`) when declaring a variable, or possibly forgetting a ";" at the end of the preceding line to where I'm calling it. This can also come about if you are using gmatch incorrectly (as in the above example), inside backticks, so that they actually return an empty value to the variable. This means that the variable was never set to anything. For example:
proc deleteLoc()
{
$sceneList = `ls -sl`;
$sceneMatch = `gmatch $sceneList`;
print ($sceneMatch);
}
Would probably get that error, since $sceneMatch never actually received a value.
∞ "Invalid use of Maya object...." | This is usually a forgotten "$" in front of a variable you're calling.
-sd
360° Ribbon Spine
So, here's the ribbon spine I rigged up quickly based on the Fahrenheit DVD's. I used their basic technique for the construction, but since my version of Maya doesn't have hair follicles, I used rivet constraints instead. I don't think I can go into much detail of how they did that due to copyright infringement, but here's a pic of some additional joints I made:
If you can follow along from the DVD tutorial, this will make more sense. Basically, I created the two-joint chain, and parented it underneath the 'midPos' locator. I deleted the point constraint that was on the 'midUp' locator, since its position will be driven by the joint now, and simply parented it under the child joint I created.
So, the hierarchy goes:
midPosLocator
.....└ joint1
...........└ joint2
.................└ midUpLocator
I orient constrained the parent joint's rotation to the top and bottom pos locators, which basically recreated the behavior of the 'midUp' locaotor's point constraints from before. But now, the child joint follows the necessary arcs.
Then, the middle circle control manipulates the midFK joint. It's parented directly under the 'midOffLocator'. The hierarchy goes as such:
midOffLocator
.......└ circleController
....................└ midFKjoint
Here's a capture of my scene hierarchy:
So you can see the modifications were really pretty simple. The final effect, however, seems relatively successful to me. I made a gif to demonstrate its abilities:
-sd
R&D
So, work has been a bit slow lately as we're waiting for some concept and modeling work to finish up, so I've been exploring some new rigging techniques and general MEL knowledge.
If any of you are familiar with Sean Nolan, he had posted some info on his site about a ribbon spine setup that can rotate beyond 180° and a skin sliding/deformation setup that is joint-based, meaning it will work in game. So, I spent today trying to figure out how those things were working and actually managed to make some progress. I'll post more info about that later, including how to recreate the files. Well... I'll see how much I can explain without infringing on certain copyright laws.
-sd
Initial
So, I'm currently employed as an animator, thoughI dabble in MEL, at Human Head Studios, in Madison, WI. Its a video game development company hidden away in the eternal frozen tundra of America's Dairy land. They're credited with creating Rune and (most recently) Prey to name a few titles.
My primary responsibilities there are character animation, rigging, etc., but I've also developed a few tools for us here, like automating a joint based deformation system for facial anim. But most of the work up to this point as been adding modifications to the Advanced Skeleton Rig. I've done a few other little tools to help increase our efficiency as well.
I'll be using this forum as a place to post animation examples, tips, discussions as well as MEL examples and tools I develop along the way. This was all inspired by Sean Nolan's site. His a lot more in depth at this point, but I figure I'll get there someday. In the meantime, I hope someone may find this site useful.
-sd
Subscribe to:
Posts (Atom)